Designing REST APIs in .NET 5
Learn best practice such as Configuring Swagger, API Versioning, use of DTOs, and Repository Pattern.
REST stands for Representational State Transfer and it is a specification for building APIs. This standard is language agnostic which means it applies to building APIs in any language of choice. This article does not go in depth in explaining the concept of REST but shows you how to fully design APIs with best practices adhered to.
.NET 5 is the new .NET framework which unifies the existing .NET Core and .NET Framework and with it, you can build desktop, mobile, web, IoT, cloud and machine learning applications.
To build an API in .NET is really easy, with the help of Visual Studio, you can get started almost immediately.
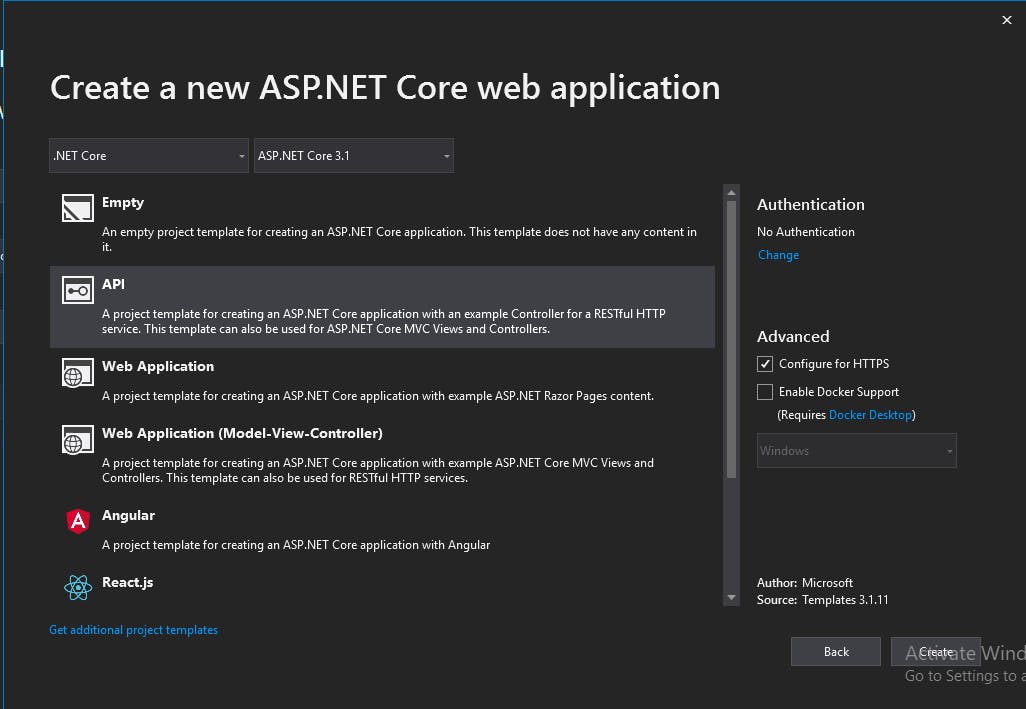
Firstly, you open Visual Studio from your local machine and click Create new project then you go ahead to select the ASP.NET Core Web Application which gives you a prompt to choose a template, you select the API template and choose the version as ASP.NET Core 5.0.
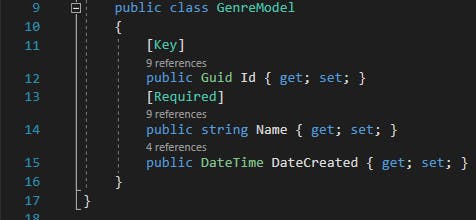
We would call our Web API, MovieApp.API. After the project has been created, we can now design our API. Create a folder called Models and add a class item, GenreModel.cs. Inside the class we would have 3 (three) properties namely, Id (Guid), Name (string), and DateCreated (DateTime).
Go ahead to create a Data folder and add a class, ApplicationDbContext.cs. Inside the class you would register the internal data access layer (Model). But for this to be successful you would have to add the following nuget packages via the Package Manager Solution:
- Microsoft.EntityFrameworkCore

For the GenreModel.cs to be registered as a table on the database, you would have to connect the application to the database using a connection string saved in the appsettings.json file.

For the application to access the table in the database, it has to be configured as a service in the DI (Dependency Injection) Container located in the Startup.cs file. The following nuget package should be added:
- Microsoft.EntityFrameworkCore.Tools
- Microsoft.EntityFrameworkCore.SqlServer

After the above configuration has been done, you can now add migrations to the database using the package manager console, if the migration was successfully created, you can then go ahead to update the database to see the changes on the migration in the database.


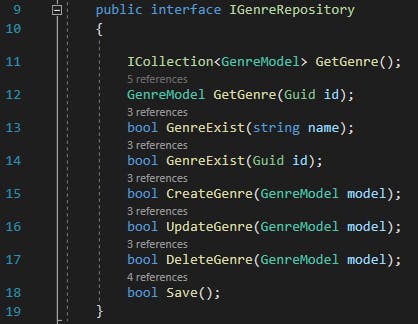
Since we are sticking to best practice we would be employing the use of the repository pattern, this helps in the separation of concerns. Go ahead to create a folder called Repository and a sub folder called IRepository. Inside the IRepository folder, add an interface, IGenreRepository this would hold the contract for the CRUD (Create, Read, Update and Delete) operation we intend to implement.
Add a class to the Repository folder called GenreRepository, this class would inherit from the interface and would implement the interface contract initialized above.
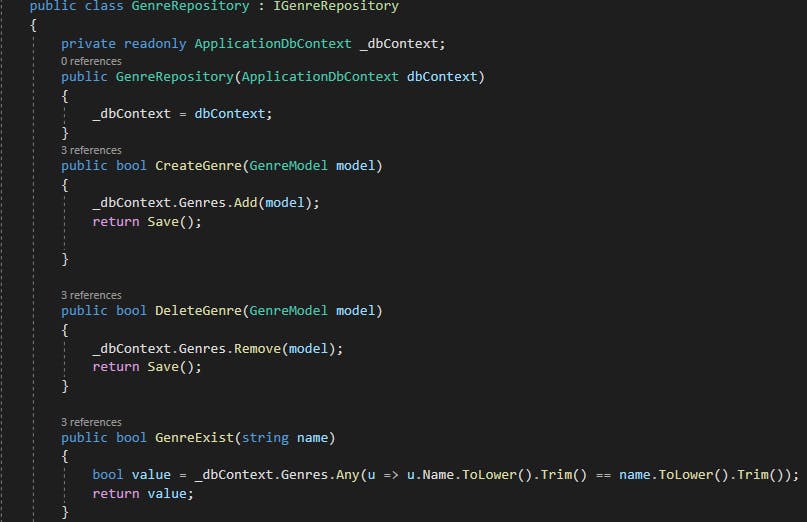
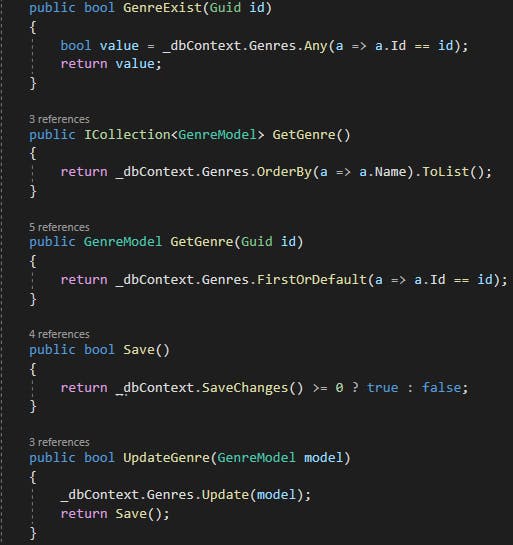
After implementing the interface, you would have to inject the Repository as a service into the DI Container to be able to access them across the application.

You can then go ahead to create a Controllers folder and add a new Controller Item called, GenresController. Inside the Controller we would create actions for Create, Read, Update, and Delete. This implies the controller actions would be making HTTP calls such as the GET, POST, PUT, PATCH and DELETE request to the server and these returns with a response. A GET request returns a 200 OK response, a POST request returns a 201 CreatedAtRoute response, a PUT request returns a 204 NoContent response, a PATCH request returns a 204 NoContent response, and a DELETE request returns a 204 NoContent response.
Create a DTO folder inside the Models folder and add a GenreDTO.cs class. Inside the DTO folder create another folder called, MovieAppMapper, inside the folder add a class MovieMapper.cs. Inject the mapping profile into the MovieMapper constructor. You would have to add the following nuget packages to complete this action:
- AutoMapper
- AutoMapper.Extensions.Microsoft.DependencyInjection
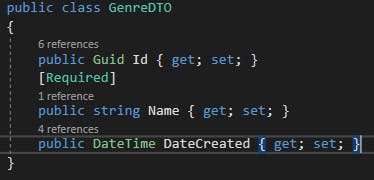

Go to the Startup.cs class and inject the AutoMapper into the DI Container

Before you can use the Repository, you injected into the service container, you would have to inject it into the constructor of the Controller. We would also be using DTOs properly known as Data Transfer Objects. This helps in automatically mapping the properties to the model and for displaying just the data you intend the client to see.
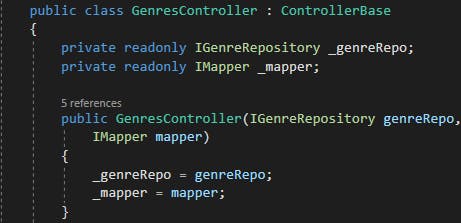
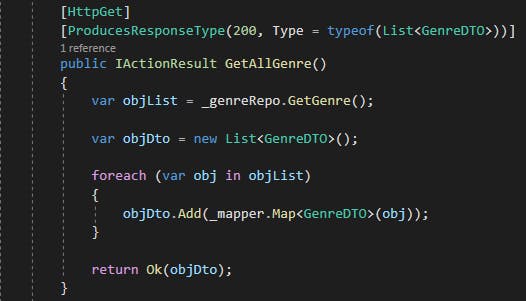
For making a GET request to the server to retrieve all the resources in the database, we create a GetAllGenre action. In this action, a request is made to the datacontext which then retrieves all the resources, the resource is then mapped into the DTO.
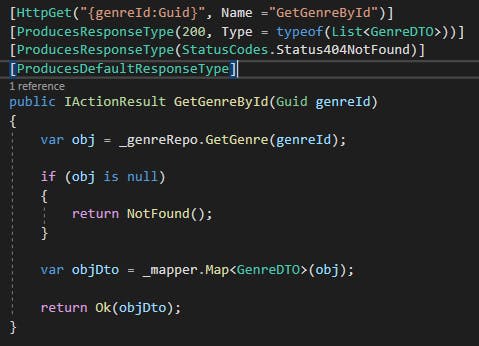
For making a GET request to the server to retrieve a specific resource in the database, we create a GetGenreById action which collects a Guid parameter. In this action, a request is made to the datacontext based on the guid parameter passed, if this is available, it returns the specific resource and maps it to the DTO.
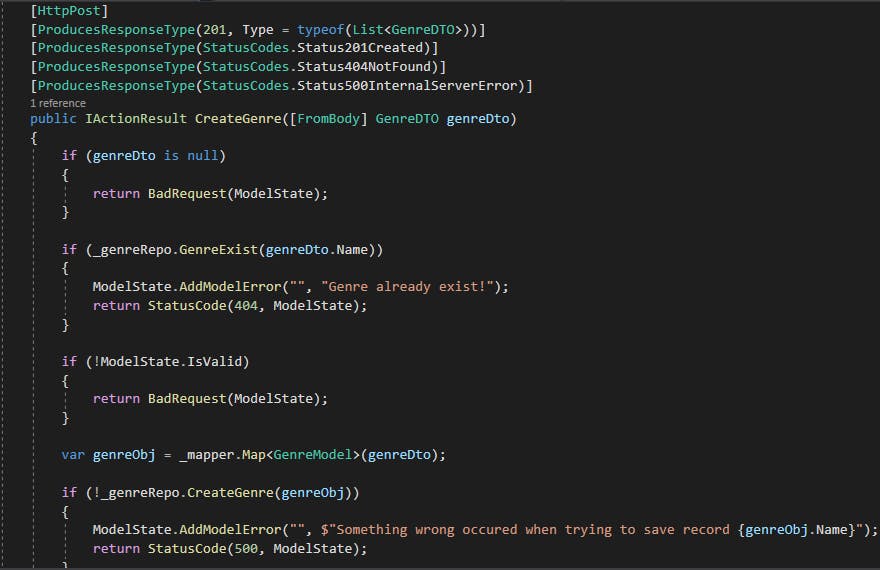
A Create Http action to the server makes a POST request to create a new resource in the database based on the content of the DTO passed. This performs checks such as whether Genre name exist and ModelState is valid, if this is validated it then maps the DTO into the model before creating the new resource.

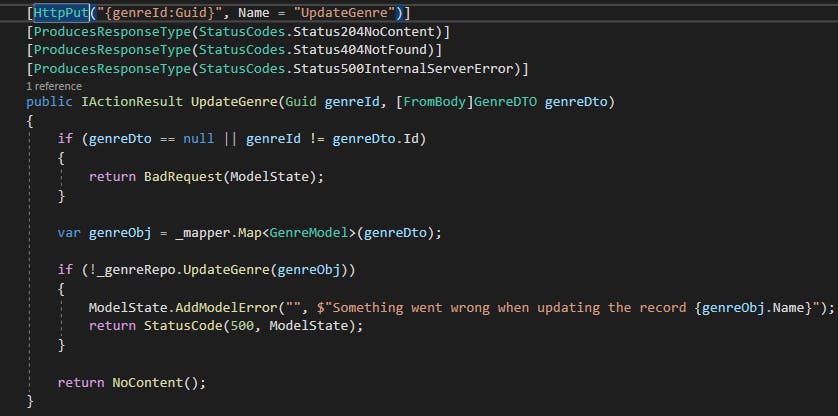
An Update Http action to the server makes a PUT request to update parts or all of the resource in the database based on the genreId and the content of the GenreDto passed. This checks if the resource is available then maps it into the model before updating the resource in the database.
There is also another Update Http action but this updates only one part of the resource in the database based on the id and JsonPatchDocument passed into the PartialUpdateGenre action. Its is called a PATCH request. Before you can successfully carry out the PATCH request you would have to install the following nuget package:
- Microsoft.AspNetCore.JsonPatch
- Microsoft.AspNetCore.Mvc.NewtonsoftJson
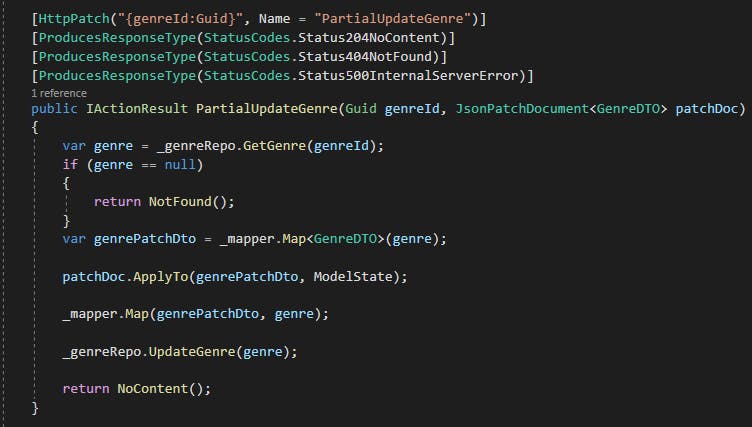
Go to the startup.cs file and configure Newtonsoft.json into the DI Container in the ConfigureServices method. Do well to add the appropriate namespaces.

Finally, the Delete Http action makes a DELETE request to the server to delete a particular resource from the database based on the id passed in.
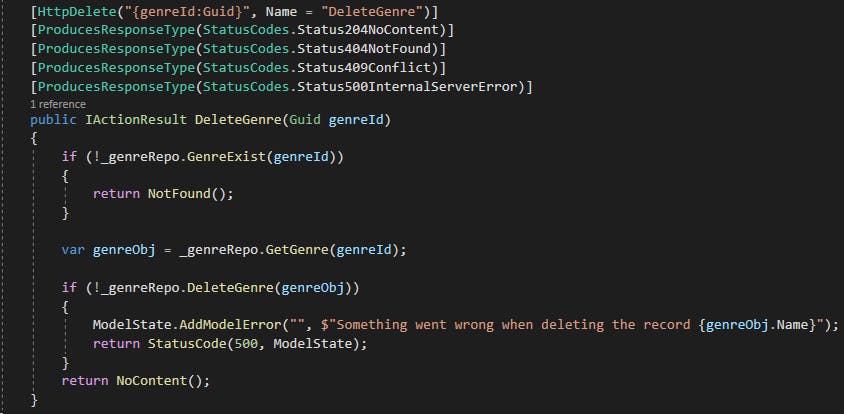
We are almost set, what remains is to configure swagger and API versioning into the application.
Swagger is an interface description language for describing RESTful APIs expressed in Json. Before configuring Swagger and API versioning in the application, we would have to install the nuget packages:
- Swashbuckle.AspNetCore
- Microsoft.AspNetCore.Mvc.Versioning
- Microsoft.AspNetCore.Mvc.Versioning.ApiExplorer
Create a class on the root of the directory, called ConfigureSwaggerOptions, inside the class, you would configure the Swagger and API versioning.
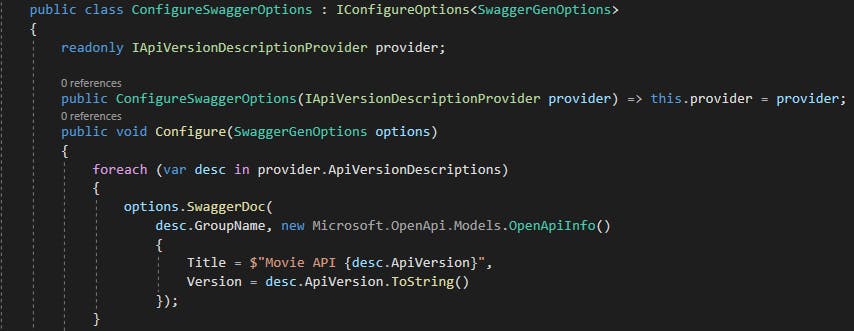
Go the Startup.cs class and inject the Swagger and API versioning services in the ConfigureServices DI Container.

On the Configure method still inside the Startup.cs class you would configure Swagger into the middleware.
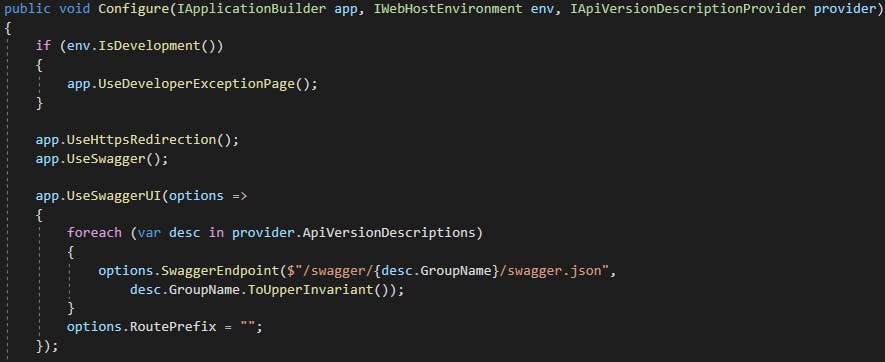
You can now add the routing and versioning on the controller.

Finally delete the following options in the launchSettings.json file for the IISExpress and run the project and test the application on the Swagger Client.

Below is how the Swagger Client / Doc looks like. You can now go ahead to test all the API endpoints we've built and see if they work.
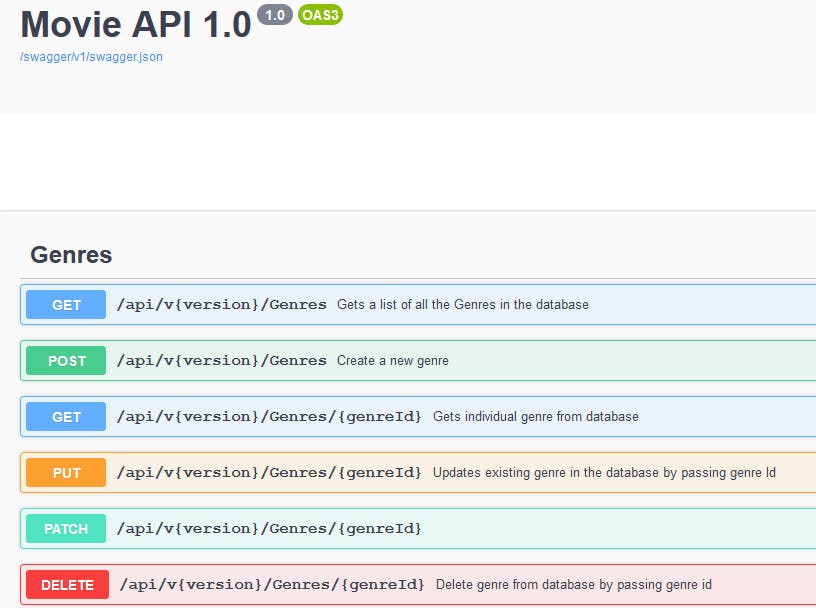
Designing a RESTful API in .NET is somewhat simple if you followed all the following steps. You can add functionalities such as Securing the API with JWT (Json Web Tokens), adding XML Comments for documentation on Swagger. In the next tutorial we would be looking at Unit testing the API controller.
